The Dreaded VanMoof Error 44: Understanding and Overcoming E-Shifter Issues
VanMoof owners often share a unique bond forged in the crucible of innovative design and, occasionally, perplexing error codes. Among these, "Error 44" stands out as a particularly common and frustrating challenge. This enigmatic message on your VanMoof's Matrix display signals a communication breakdown with the bike's automatic E-shifter, effectively grinding your sophisticated gear changes to a halt. Far from being a mere inconvenience,
VanMoof Error 44: E-Shifter Communication Failure can significantly impact your riding experience, turning smooth transitions into a single-speed struggle or, in some cases, rendering the bike unusable.
But fear not, fellow riders. While the automatic E-shifter is a hallmark of VanMoof's sleek design, understanding Error 44 opens doors to effective troubleshooting, temporary workarounds, and even the possibility of manually regaining control over your gears. This comprehensive guide will delve into the intricacies of this error, providing practical advice, from simple resets to advanced manual gear setting tips, empowering you to beat VanMoof Error 44 and reclaim your ride.
Decoding VanMoof Error 44: Causes and Symptoms
To effectively combat VanMoof Error 44, it's crucial to understand its roots and how it manifests. This error is not just a random glitch; it's a specific indication of a crucial component failing to communicate.
What is VanMoof Error 44?
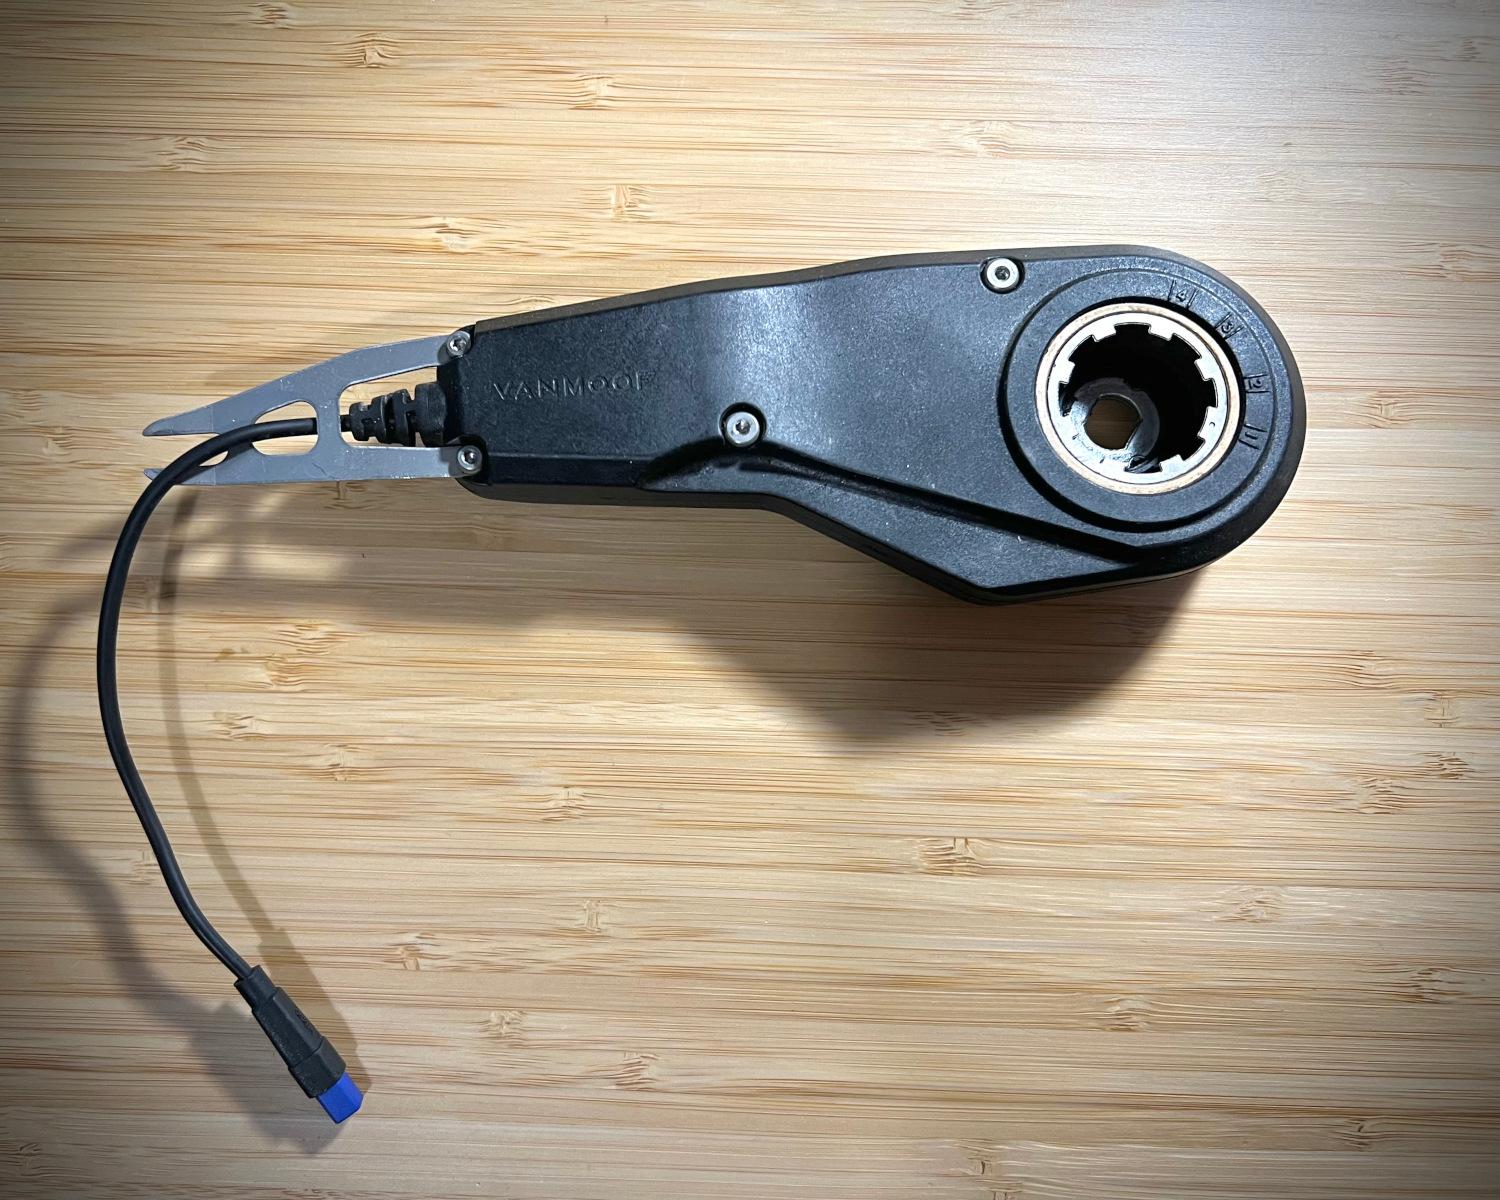
At its core, VanMoof error code 44 signifies a disruption in the digital dialogue between your e-bike's main system and its E-shifter module. VanMoof, in its quest to be the "Apple of e-bikes," pioneered an elegant, automatic electronic gear shifting system. Instead of traditional manual shifters, the E-shifter intelligently adjusts gears based on speed, providing optimal torque from a standstill and higher speeds when cruising. When Error 44 appears, this sophisticated system has gone silent, leaving your gears stuck or unavailable. The error is particularly prevalent in VanMoof S3 and X3 models, which rely heavily on this integrated electronic shifting.
Why Does VanMoof Error 44 Occur?
Several factors can trigger VanMoof Error 44, ranging from simple disconnections to more complex electronic failures:
- E-Shifter Cable Issues: This is arguably the most common culprit. The E-shifter relies on a dedicated cable for power and data transmission. If this cable becomes loose, damaged, or completely disconnected, communication ceases, and Error 44 pops up. The E-shifter typically uses a compact 4-pole trapezoidal Higo connector, known for its robust design but still susceptible to physical stress or improper seating.
- Electronic or Software Malfunctions: Less frequently, the E-shifter module itself might suffer an internal electronic failure, or a software glitch in the bike's firmware could prevent proper communication. This could be due to manufacturing defects, water ingress, or even a corrupted update.
- Physical Damage: Impacts, drops, or even rough handling can stress the E-shifter module or its cable, leading to internal damage that breaks the communication circuit.
Recognizing the Symptoms
The primary symptom of VanMoof Error 44 is the persistent display of "Err 44" on your bike's Matrix display, often accompanied by a distinct absence of gear shifting. While some sources suggest the bike won't turn on or charge, this is a less common direct symptom of Error 44; usually, the bike will power on but be unable to shift gears. You'll particularly notice the error appearing or persisting when the bike comes to a complete stop, as this is often when the system attempts to reset its gear position. Your bike might feel sluggish from a start or struggle to maintain speed, depending on which gear it's stuck in.
Initial Troubleshooting Steps: Your First Line of Defense
Before considering replacements or complex workarounds, there are several straightforward steps you can take to address VanMoof Error 44. These basic troubleshooting techniques often resolve the issue, saving you time and money.
The Power Cycle & Cable Check
The simplest fixes are often the most effective. Your first course of action should be:
- Reset Your E-Bike: Perform a hard reset by pressing and holding the power button (usually located under the top tube or on the downtube) for approximately 10-15 seconds until the display turns off and then restarts. This can clear temporary software glitches and force the bike to re-establish communication with all its components.
- Inspect the E-Shifter Cable: Locate the E-shifter cable connection. On VanMoof S3/X3 models, this usually connects near the rear dropout, close to the rear hub. Look for the small, often blue, Higo connector.
- Check for Firm Connection: Ensure the connector is fully seated and securely pushed in. A loose connection is a frequent cause of communication failures.
- Examine for Damage: Carefully inspect the cable for any visible signs of fraying, cuts, kinks, or pinched sections. Even minor damage can interrupt the delicate data signals.
- Clean the Contacts: If you're comfortable, gently disconnect the connector (be careful not to pull on the wires) and check the pins for dirt, corrosion, or moisture. Use a soft, dry cloth or cotton swab to clean them if necessary. Reconnect firmly.
Software Considerations
Occasionally, software inconsistencies can lead to communication errors.
- Update Firmware and App: Ensure your VanMoof bike's firmware is up to date via the VanMoof app. Also, check that you are running the latest version of the VanMoof app itself. Software updates often include bug fixes that can resolve underlying electronic communication issues.
- Re-pair Your Bike: In the VanMoof app, try unpairing and then re-pairing your bike. This can sometimes reset the bike's internal communication protocols.
For more detailed DIY fixes, troubleshooting guides, and preventative measures, explore our dedicated article:
VanMoof Error 44: DIY Fixes, Troubleshooting & Prevention.
Beyond the Basics: E-Shifter Workarounds and Manual Gear Tips
If initial troubleshooting doesn't resolve VanMoof Error 44, it's time to consider more robust solutions, ranging from professional repair to ingenious community-driven workarounds, including manual gear settings.
The E-Shifter Replacement Dilemma
When cable checks and resets fail, a faulty E-shifter module is often the culprit. Replacing the E-shifter can be a definitive fix, but it comes with its own considerations:
- DIY Replacement: VanMoof has historically provided tutorials for E-shifter replacement, and various online communities offer guidance. If you're comfortable with basic bike mechanics and electronic connections, a DIY replacement is feasible. However, sourcing genuine replacement E-shifters can be challenging, especially given the brand's fluctuating operational status.
- Professional Help: If you're not confident in tackling the repair yourself, or if the problem persists after replacement, seeking assistance from VanMoof customer service (if available) or a certified e-bike repair workshop is recommended. They have the expertise and specialized tools to diagnose and replace the component correctly.
Understanding the Manual Gear Option
Perhaps the most empowering workaround for a persistent VanMoof Error 44 is the ability to manually set your bike's gears. The VanMoof S3 and X3 utilize a Sturmey Archer internal gear hub, which, despite its electronic control, still functions mechanically. This means you can bypass the broken E-shifter and physically set the hub into a desired gear.
Here's why and how this is a game-changer:
- Regain Usability: Even with "Err 44" displaying, a manually set gear allows your bike to be ridden, retaining its motor assistance (up to 15.5mph / 25km/h in many regions) and the boost button functionality. You simply won't have automatic shifting.
- Choosing the Right Gear: For most urban and mixed-terrain riding, setting the hub to 3rd gear (out of 4) is highly recommended. This gear provides a good balance: enough torque to get going from a standstill with motor assistance, and sufficient speed for cruising without excessive pedaling. First gear might be too slow, and fourth gear too hard to start from.
- How to Manually Set the Gear (General Principle):
- Remove the E-shifter: The first step involves carefully removing the broken or faulty E-shifter module from its position near the rear hub. This often requires disconnecting its mounting bracket and the Higo connector.
- Locate the Indicator Chain/Rod: Inside the Sturmey Archer hub, you'll find a small indicator chain or rod that controls the gear selection.
- Adjust to Desired Gear: By gently pulling or pushing this rod, you can manually select a gear. For 3rd gear, you typically adjust the rod until its end is flush with the axle nut or a specific mark, indicating the engaged gear. This may require some trial and error, or consulting specific Sturmey Archer documentation for your hub model.
- Secure the Setting: Once the desired gear is set, you may need to secure the rod's position or re-assemble parts to ensure it stays put. Remember that the bike will still display "Err 44" when coming to a stop, as the system still expects communication with the E-shifter, but the bike will be rideable in the fixed gear.
Important: This process requires careful handling to avoid damaging the internal hub mechanism. If you are unsure, consult a professional mechanic.
The DIY E-Shifter Module (Advanced Users)
For the most technically inclined, the VanMoof community has seen intrepid individuals attempting to reverse-engineer the E-shifter's communication protocol. The goal is to build a custom module that "spoofs" the original E-shifter, restoring full automatic gear functionality. This path involves:
- Reverse Engineering: Analyzing the electronic signals and protocols exchanged between the bike and the E-shifter, often using tools like oscilloscopes and microcontrollers.
- Building a Replacement Module: Creating a custom electronic circuit that mimics the E-shifter's responses, typically involving components like microcontrollers (e.g., Arduino-compatible boards) and custom firmware.
- Connector Sourcing: Identifying and sourcing the specific Higo connectors (like Z409FM and Z409FG) to ensure a seamless connection to the bike's existing wiring harness.
This advanced solution is a testament to the ingenuity of the VanMoof owner community, offering a complete restoration of the original functionality. However, it requires significant electronics knowledge, soldering skills, and a deep understanding of embedded systems.
Preventing VanMoof Error 44: Proactive Measures
Prevention is always better than cure. While some issues are unavoidable, proactive maintenance can significantly reduce your chances of encountering VanMoof Error 44.
- Regular Cable Checks: Periodically inspect the E-shifter cable and its Higo connector for any signs of loosening or damage, especially after rough rides, transporting the bike, or if it's been stored in a way that could put stress on the cable.
- Gentle Handling: Avoid pulling on the E-shifter cable or placing excessive strain on the rear hub area. Be mindful when locking your bike or leaning it against objects that might inadvertently snag or pinch the cable.
- Keep it Clean: Regularly clean your bike, paying attention to the connections around the rear wheel. Dirt, mud, and road grime can ingress into connectors, leading to corrosion and poor contact over time.
- Software Updates: Always keep your VanMoof app and bike firmware updated. These updates often contain critical bug fixes and improvements that can enhance system stability and prevent communication errors.
Conclusion
VanMoof Error 44 might be a frustrating roadblock for many e-bike enthusiasts, signaling a temporary halt to the seamless, automatic gear changes that define the VanMoof riding experience. However, understanding its causes and knowing the array of solutions at your disposal can transform this challenge into a manageable fix. From simple troubleshooting like power cycles and cable checks, to the empowering option of manually setting your gears for continued riding, and even advanced DIY e-shifter modules for the tech-savvy, there are numerous pathways to overcoming this common issue. By taking proactive measures and knowing your options, you can effectively beat VanMoof Error 44 and continue to enjoy the innovative design and exhilarating ride your VanMoof e-bike offers.